Monday, February 23, 2015

[ getting inspired ]

Follow my blog with Bloglovin

SO anyone who follows me on Pinterest has noticed that I've been pinning a lot of art and art studios lately. I've been tossing around the idea of getting out my artist brushes again and creating some art. My guy bought me a lovely easel for Christmas and now that I've got it all assembled and my studio taking shape, it's time to get painting!

There's nothing like an art fair to get your creative juices flowing and this weekend we decided to check out the Artist Project in Toronto. 250 artists from Canada and abroad were showcasing their work at Exhibition Place and what an amazing show. Browsing through galleries is fun but there's nothing like meeting the artists themselves and hearing about their inspirations and how they've adopted their particular technique.

Here are just a few of my faves from the show...


...and here are a few more whose cards I didn't get so I don't have their contact info but I'll show you their eye candy since they're so beautiful:


What a great way to spend a chilly Sunday afternoon! I left feeling totally uplifted and inspired to get cracking on creating some art. No point letting my art school/design degree go to waste!

lisa

Wednesday, February 4, 2015

[ 5 years and thoughts ]


IT'S incredible to think that this little blog-o-mine has been around for 5 years! It's always during these blogiversaries that I realize how quickly time goes by.

When I started this blog, I was taking my first official step away from my magazine art directing career for good. I was living as an expat in Ireland and I had decided to give up the freelance work I was doing and focus on my newly discovered handbag designing business full-time. No one could have predicted where time would lead me ~ moving to Dubai was certainly never on my radar ~ or that I would have to shelf my handbag business while there due to logistical problems.

Now that my expat days are over, I have to admit moving back to Canada has definitely been an adjustment. I had heard many times that the longer you live away as an expat, the more difficult it is to readjust to life in your home country. I didn't really believe it at the time, but after 7.5 years away and now after almost 8 months being back, I understand what people were talking about. I think it's been less of an issue for my guy ~ he's been so busy with work all along ~ but still, old familiar things have felt foreign and it's been weird discovering the changes that have happened while we've been away ~ new plastic-feeling currency, no more pennies, tv shows and movies we had never heard of, cities exploding in size with new neighbourhoods, new stores, a new stat holiday in February...etc.  My brain forgets to readjust all the lingo from overseas to local lingo like pants, pop, gas, cab, cell, loonie, etc. And I've had to remind myself that this is not just another visit and I don't need to stock up on items I can't find overseas to load up my suitcases, our house is really ours and not just another rental and it's ok for me to change whatever I want.

But the biggest adjustment? I can pursue whatever I want now. I think this has had me the most stumped of all. Do I revive my handbag business or start something new? Do I go back to my old career or savour not working in an office? Do I take a course? Do I start a new hobby? What about my blog? Being an expat gave me plenty to blog about while I explored new places, new cultures, new hobbies. Now that I'm back, finding topics to blog about have felt dull and uninspired ~ hence the sporadic posts ~ and I've felt a bit like I've been floating about, unsure as to where I'm headed. I'm sure I'll eventually figure it out. I know that everyone goes through blips like this so it's nothing new. But for now, thanks for so patiently sticking around and for still popping in to see what's new. I'll try to say 'hello' a little more often! xo

lisa

[via houseofturquoise]

Thursday, January 1, 2015

[ happy new year! ]


IT'S 2015! {can you believe it?}. It's incredible how quickly the years fly by. New Year's Day is always a time to reflect back on last year and think about how things panned out ~ did you accomplish what you set out to? Did you live the best life possible? Were you happy?

When I think back to what I knew a year ago, I never would have expected some of the things that happened to happen ~ some great, some not so great. I'm not one to make many resolutions but I hope  to live 2015 as healthy as I can, as happy as I can and as kind as I can. If I can do that, 2015 will be a great year! Happy New Year and here's wishing you a wonderful 2015. I hope that everything you set out to accomplish will come true!

lisa

Thursday, December 25, 2014

[ merry christmas! ]

FROM our home to yours...


have a wonderful Christmas filled with joy, laughter and holiday cheer!

lisa

Thursday, November 13, 2014

[ backsplash reveal ]

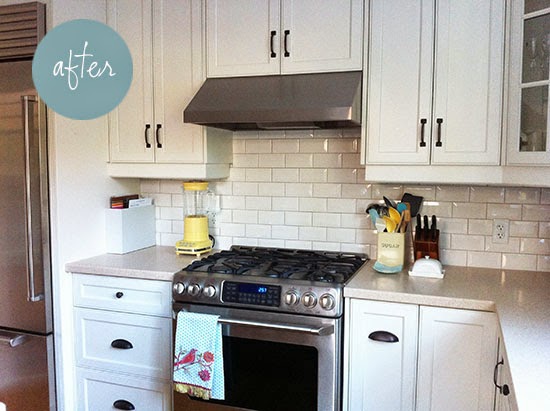
WHEW! We're done with the backsplash! And I must say my guy did a great job ~ it turned out better than I expected {which is always a nice thing!}

You may remember the before...


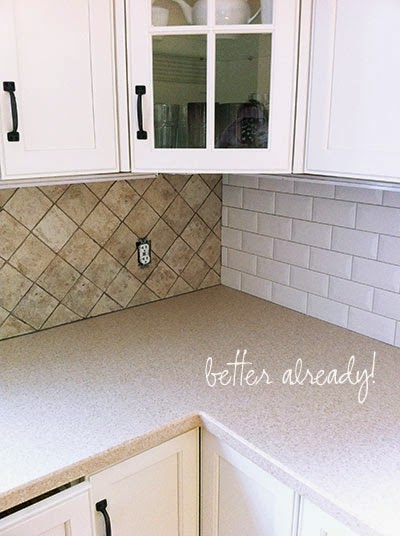
That pinkish tumbled tile was not doing the kitchen any favours ~ it looked drab and dingy. We chose a white bevelled subway tile, a classic look that we thought would marry well with the cabinets and the Corian countertops.

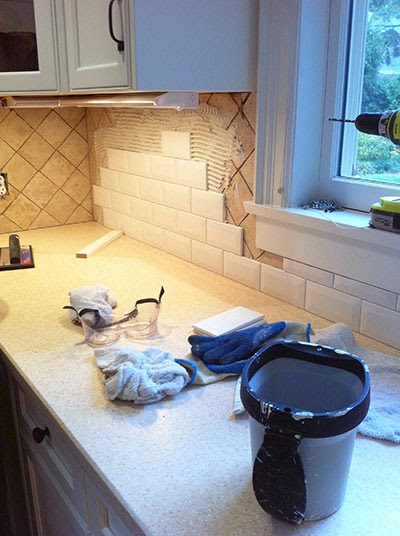
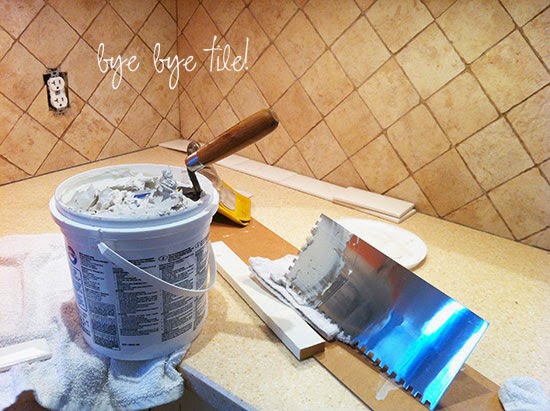
Ok, here's our big secret... we tiled over the old tile! Yes, sometimes you CAN tile over tile depending on your situation. The old tile was so well adhered, there was no way it was coming off without tearing out all the drywall with it all the way around the kitchen, and that would have been a much messier and time-consuming project. {We tiled over our tile in our Muskoka place years ago for that exact same reason}. We knew that the only challenge we would face would be the trim under the windows but we had a plan for that.

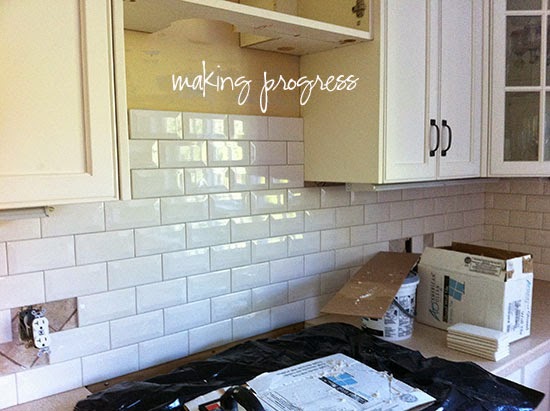
We started by cleaning the old tile very well with TSP, then we planned out where to start/stop to ensure that the cuts would work well around the windows and in the corners. Then, off to the races!


Gosh, doesn't that make the old tile look so bad??!


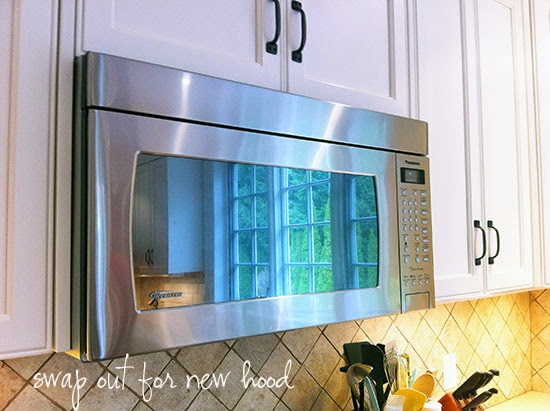
While we were at it, we decided to swap out the over-the-range microwave for a new hood {which is a better idea over a gas range}...


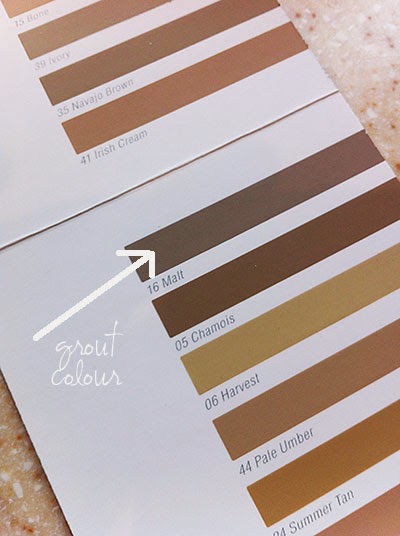
Once all the tile was installed, it was time to grout. I love the trend of grey grout nowadays and wanted a similar look, but needed to keep in mind the colour of our countertop to make sure it worked together. So, I chose Malt which was a medium greyish brown...


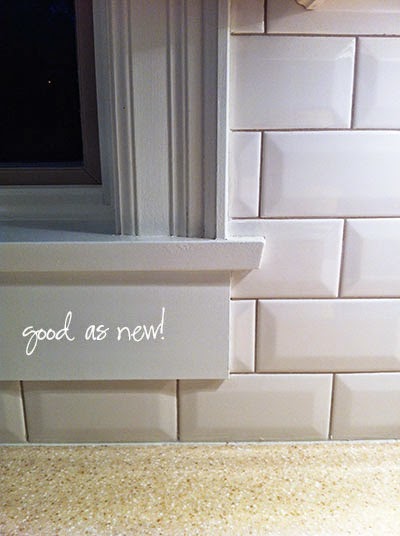
Once the grouting was done, all we had to do was refasten the electrical outlets with longer screws, caulk around the edges and build out the bottom of the window trim since it was now flush with the tile. We applied a 1/4" thick piece of wood over top of the existing trim using glue and a nail gun...


...then painted it out. Good as new! {How amazing is that notched cut around the trim? - thanks hun!}


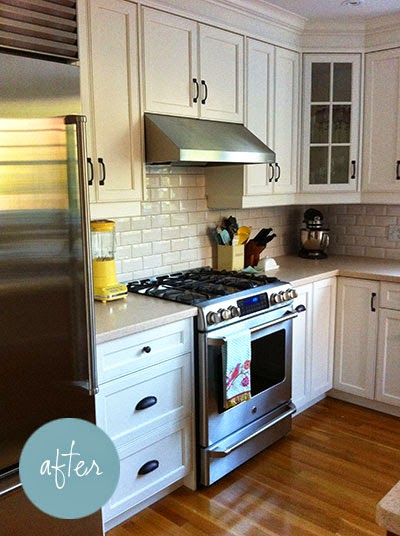
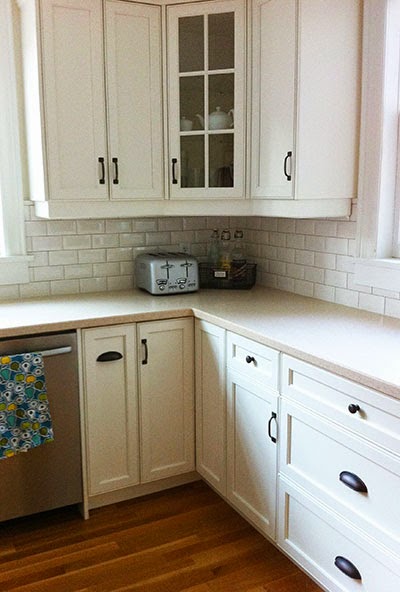
I have to say that I'm in LOVE with the new tile! What a difference it has made. I love the bevels which catch the light and add a bit of sparkle to the kitchen. Even the countertops blend in nicely now. The grout colour is just dark enough to provide contrast without demanding all the attention. A new hood and counter-depth fridge and the entire kitchen feels new...


It feels great to have this project done. Using the bevelled tile was a little tricky, both with cutting {my guy used a wet tile saw} and with joining up in the corners {flat subway tile would have been much easier} but I think it was definitely worth the time and effort. I'm certainly blessed to have a guy so handy!

lisa

Friday, November 7, 2014

[ bye bye tile! ]

I KNOW, you've probably been wondering what's been going on around here.... well, it's got a lot to do with this...


Yup, that's our backsplash tile. You may remember when I talked about undertones when I was painting my kitchen {read the post here}...


Well, getting rid of the peachy paint definitely helped, but we knew that this tile wouldn't be sticking around for long. It looked drab and felt like it was bringing the entire kitchen down.

Today's post is just a teaser but here's an idea of what's inspiring me...


I love classic white subway tile. It looks fresh and never goes out of style. We considered marble tile again {I loved it in our Muskoka place}, but these speckled corian countertops are definitely dictating our choices. Though I would never have chosen these countertops, I'm not about to start replacing them ~ there's a lot of counter! So, we had to decide on a tile that would work with them instead of work against them. 

Hopefully we can wrap up this project on the weekend and I can show you some Afters next week! 

That's what I've got planned for the weekend ~ what about you? Have a good one!

lisa
[via dustjacketattic.tumbler; sulia.com; theinspiredroom.net]

Monday, October 27, 2014

[ reviving a door ]


THIS SIDE door to our kitchen has been crying out for a new life. Worn out flat paint, some sad looking hardware and cheap white plastic trim was not the welcome home I was after...


While I would have loved to install a new door like this...


it just wasn't in the budget right now. So time to give this old gal a new life...


I chose Behr Marquee paint in Peppery. This paint/primer-in-one is nice and thick and could have almost done the job in one coat but I put on two thin coats...


The thing I love about my inspiration door is that there is no white trim around the window. So I wanted to try to replicate that as much as possible. The window grills were encased inside the window so there wasn't anything I could do about that, but the surrounding plastic white trim was perfect for painting out...


Add some pretty new hardware and tadaaa! A "new" door! I kept the cream colour around the door frame since it matches all the trim around our windows...


I love that the plastic trim almost disappears now. I also like the contrast of the dark grey door inside the kitchen too. It helps to keep everything from looking too white. 

For the cost of some paint and some new hardware, I think this door is looking pretty good now and much more welcoming to come home to.

lisa

[inspiration door via timelesspaper.com]

Thursday, October 9, 2014

[ making pumpkins ]


IT'S Canadian Thanksgiving this coming weekend {it always seem to sneak up on me since it's so early in the fall} so I thought I'd better get going on a few decorations around here.

I've loved velvet pumpkins since I first saw them a few years ago but couldn't find the supplies I needed while in Dubai. So, now that we're back in Canada, I thought I would finally make a few to add to my antique dough bowl on my dining room table.

This is a very easy project and I had 5 of them made in less than a couple of hours. First, gather supplies...


tips: If you have trouble {like I did} finding velvets, you can use velour or low-pile fabric with a bit of a fuzz ~ really, anything can work if it's not too stiff. If you are using real stems, be sure to clean them well and bake them on a cookie sheet on low temp for a half hour or so to dry them out {or use some plastic ones from a craft or dollar store if you can find them}. The pumpkins turn out best if you use both beans {or pebbles or rice, etc} and craft stuffing to stuff them with. I used glass pebbles I found at the dollar store which I prefer to natural beans or rice if I plant to store them for future years. For glue, I used E-6000 glue but I'm sure a glue gun would work well. 

Trace a plate on the backside of the fabric and cut out...


Sew a running stitch all the way around the circle...


Fill with pebbles about 1/3 and then fill the rest with craft stuffing and pull tight, careful not to break the thread {I used double thread or you can try dental floss for added strength}...


Sew hole closed by pulling edges together and knot off thread. I went one step further and pushed my needle down through the middle of the pumpkin to the bottom to create one big stitch and pulled it back up which added a cute little pinch to the pumpkin shape but this is optional...


Glue on stem and you're done!


You can make them various sizes in a variety of fabrics and they make a charming little grouping. And the best part is, they'll be ready for you again next year!

Happy crafting!

lisa

LinkWithin

Related Posts with Thumbnails