Saturday, September 21, 2013

[ montreal in dubai ]

ANYONE who's been to Montreal knows that topping the list of must-eats is a smoked meat sandwich and some poutine. So imagine our surprise when we heard that there's a new little place open in Dubai specializing in just that...


So of course we had to check it out!

A traditional smoked meat on rye, pickle on the side and an order of poutine {fresh cut fries, cheese curds and gravy}...


And the verdict? Pretty darn good! And since I wouldn't typically have both in one sitting, half of my sandwich to bring home for lunch!


It's always so nice to find a little taste of Canada. We'll definitely be back!

lisa

Monday, September 16, 2013

[ a tova for all seasons ]

THE TOVA by Wiksten has taken blogland by storm and I can see why ~ a comfy top, dress or tunic that's easy to wear and universally flattering ~ and with no fussy zippers or buttons, it's easy to make. I decided to jump on board and I just finished mine. I think it's perfect with a pair of jeans...


I used a very light cotton sheeting fabric which was very easy to sew. I went through my fabric stash and decided to add a coordinating tiny floral fabric for the inside of the collar, especially since the collar sits open and is very visible. I'm really glad I did ~ I think it adds a special little detail...


The pattern is available from Wiksten as a pdf download which is super convenient. The instructions are thorough and easy to follow ~ just download, print, tape together and cut out ...


I made a couple of changes to my pattern:
1} I made the collar 1/2" narrower and rounded the top corner
2} I chopped off 2.5" off the length to make it more like a shirt than a tunic
3} I sewed the placket closed about 1.5" from the bottom so that I don't need to wear a tank underneath all the time

It seems that everyone who has made this top has made multiples and I'm already thinking about my next one. Here are some pretty examples from blogland done as various tops and dresses...


Aren't they great? I think my next one will be a solid or tiny print ~ maybe a grey. Wouldn't a soft flannel be so cozy for fall?

If you want to give it a try, pick up the pattern here and read through the sew along over at verykerryberry for some great tips.

lisa

Wednesday, September 11, 2013

[ finally - my gallery wall! ]

I KNOW, I've been talking about putting up a gallery wall for what, about 2 years now? Seriously, this has been the longest project I've ever had kicking around. But I FINALLY got everything hung up!

I decided to stick to a beach/swimming theme and have had fun sourcing out some great pieces on our travels and online. I used mostly white IKEA frames to frame everything up which was the most time-consuming part. Originally I had planned to run this along our long dining room wall in the apartment but now that we've moved, I split it up into 2 groupings ~ one over the sofa and the other over the 2 slipcovered chairs.

First, I planned it out on the floor, moving pieces around until they seemed to fit together...


Thank goodness for these for our concrete walls {I should buy shares in 3M!}...


I measured the centre of the grouping and measured the area above the sofa to find a starting point. I decided that the bottom of the grouping would be about 6 inches above the sofa. Then I started from the  centre bottom and worked my way out from there...


I used a tiny level to keep everything straight and used the top and bottom edges to make aligning quick and easy, filling in as I went along...


Soon the first wall was done!


For the second grouping, I decided to incorporate my beach photo I had enlarged onto canvas a while back and fill in with other smaller pieces, including the wooden Malaysian sandals I bought on our trip to Langkawi a couple years ago...


I purchased one of the deep shadow box style frames from IKEA but discovered a slight problem...


The depth of the frame was not deep enough to fit the sandals behind the glass. Hmm... what to do? Well, I decided that I would simply remove the glass, paint the backing board and screw the sandals onto the board from behind. Time to get painting...


A few coats of paint later and I think it worked out just fine...


I followed the same routine to get the second grouping up above the chairs. I love that the sandals add a bit of an unexpected element to the grouping...


All in all, I'm really pleased with how my gallery has turned out. It took forever to get there but it's a great mix of both happy memories and fun finds.


Have you tackled a gallery wall in your home?

lisa

Monday, September 9, 2013

[ fancy feet ]

IT'S NO secret that not only do I love bags, I also love shoes. The funny thing is that I don't typically splurge on shoes. As much as I love all those beautiful designer heels, I usually shop very modestly for my shoes.

Well, Saturday changed all that when I walked into Tory Burch and fell in love with these shoes ~ with a heel height that any normal person can wear!


I've been on the hunt for a while now for great shoes that can work with dresses or pants, but not something with heels 4" high {because for me, after living in the comfort of Toms, it's not happening!}. 

These beauties may have cost a bit more but their classic shape means that I don't need to worry about them going out of style right away. I consider them an investment in my wardrobe. Now all I need is an occasion to change out of my shorts and t-shirts!

Have you picked up any new footwear lately?

lisa  

Wednesday, September 4, 2013

[ pucker up ]

LEMON desserts are high on my list of favourites and this lemon square recipe is not only easy, it doesn't require a lengthy list of ingredients. If you don't have fresh lemons, you can use bottled lemon juice {although I think adding in the zest of a lemon into the crust makes them extra delicious!}


lisa's pucker-up lemon squares

what you need

crust
2 cups all-purpose flour
1 cup butter, cold, cubed
1/2 cup sugar
zest of one lemon (optional)

filling
4 eggs
4 tbsp all-purpose flour
1 1/2 cups sugar
1 tsp baking powder
2 large lemons, juiced (1/2 cup of juice)

how to

Preheat oven to 350F (175C).
In a medium bowl, combine flour and 1/2 cup sugar. Grate in lemon zest. 


Cut in cubed butter with a pastry blender.


Press into an ungreased 9x13 pan. Bake for 15-20 minutes until golden.


Whisk together all filling ingredients. 


Once crust is baked, pour filling over the baked crust and bake for an additional 20 minutes. Remove from oven and let cool (squares will firm up as they cool). 

When cool, dust with icing sugar, cut into squares and serve (or refrigerate to serve them chilled). Yum!

lisa

Sunday, September 1, 2013

[ art in parks ]

ONE OF the highlights of our trip back was being able to visit a couple of outdoor art shows. Some of you might remember this back in 2010...


Yup, that was my booth at the Muskoka Arts & Crafts Summer Show {read about it here}. So much fun and I really hope I can do it again someday! 

So you can imagine how excited I was to learn that we would be in Muskoka on the weekend of this year's show...


It was fun to see some familiar faces and some new artists this time too. I find these events so inspiring and they make me want to get busy creating!


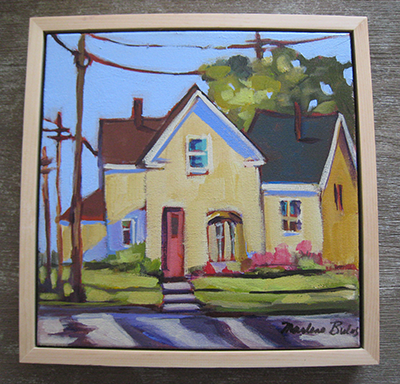
So what did I buy? Well, it was difficult not to go crazy but I decided to limit myself to a new painting {I've been trying to build up a bit of an art collection of original works and these art shows are an excellent place to do so. This cheerful original is by Marlene Bulas...


But as luck would have it, this wasn't the only outdoor art show we visited! We happened to be in Oakville, Ontario for their annual Art in the Park show as well. Much smaller in scale but so many beautiful works of art...


And you guessed it ~ I bought a painting! This one is by Robin Mitchell...


I'm so thrilled with my 2 new acquisitions {doesn't that sound fancy?} 

Have you been to any fun summer events this year?

lisa

LinkWithin

Related Posts with Thumbnails