Showing posts with label furniture facelift. Show all posts

Friday, September 12, 2014

[ from free to fab ]

FIRST, thanks everyone for weighing in on my fireplace! It's good to know that we're all on the same page ~ that baby needs a paint job! I think it will make a huge difference in the room and actually make it feel a bit more spacious since it does seem to dominate the room right now.

In the meantime, I've been working on another little project this week. Since we're using our tufted ottoman in the family room, I've been on the hunt for a coffee table for the living room ~ on a budget. I decided to take a peek on Kijiji {Canada's alternative to Craigslist}. And you can't get a better deal than this...


Seriously, a FREE coffee table just waiting to be loved! I know, it wasn't looking too great in the ad but I could see it's potential. I liked the legs, the wicker bottom shelf and the bevelled glass top. 


I decided to give it a new life with Annie Sloan chalk paint. This was the first time using actual chalk paint ~ the last time I made my own {read about it here}. To be honest, it performed very much the same way as the homemade version. I was able to paint the entire table using only one sample pot...


I chose Pure White and got started. I didn't bother to sand ~ I just wiped it down first with a cleaning wipe. Here it is after one coat...


After a second coat, some sanding on the edges and a light coat of wax, it's done!


I love that it's the perfect size for the sofa and the glass top gives it a bit of lightness. The pure white will also look great when I dress the sofa with the white slipcover I made {read about it here}...


Not bad, huh? I'm super thrilled with the results and it was definitely worth the 20 minute drive to pick it up. 

Have you ever scored a freebie and given it new life?

lisa

Monday, March 25, 2013

[ sofa 911 ]

REMEMBER that sweet day when my lovely Laura Ashley sofa arrived after weeks of waiting?


How I loved her... so comfy and fabulously plump! Well, fast-forward a year and a half ...


What the heck? I've never had sofa cushions melt down to almost nothing. Even with weekly plumping and flipping of the cushions, this is what I get! 

Now if we were living anywhere but here, I would contact the manufacturer and voice my complaint. After all, this wasn't an inexpensive purchase. But being in Dubai, it's a known fact that anything you buy, well, you're pretty much on your own and it simply isn't worth the aggravation (we've already gone through a toaster, microwave and water cooler).

So what to do? I needed to figure something out since it was becoming uglier by the day and so uncomfortable. Finding supplies here is virtually impossible. Until, a lightbulb moment! A foam mattress from IKEA!


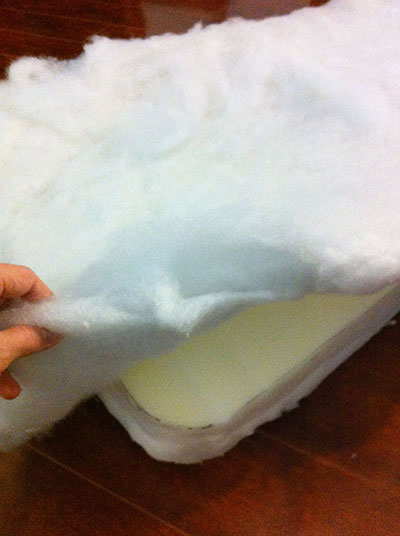
I decided I could cut it up to create new cushions and give this baby some support. When I opened up the top cushions, I was disappointed to discover that all they consisted of were three horizontal channels filled with this...


No wonder! Nothing more than the filling you would find in cheap toss cushions! And we all know what happens to them after a while ~ pancakes! I measured the cover and cut a rough piece out of the foam with an exacto knife...


then I checked it for fit...


I flattened out the old filling and wrapped it around the sponge to create some softness and round out the edges...


then put it all back into the old interior casing and sewed it up...


Much better! Maybe not as squishy, but definitely back to its original shape...


I opened up the seat cushions to see what was inside...


Hmm... similar thing. Where were all the feathers it was supposed to have? I counted a handfull. Argh. 

Since I had only used 2 "tubes" of old stuffing to wrap around the foam for the back cushions, I still had 4 leftover. I decided to try stuffing them into the channels on the seat cushions to overstuff them and hopefully retain that soft, cushiness we love about this sofa. It seemed to do the trick...


Much better! I got my cloud-like sofa back {well, except for the back cushions which are a bit firm}. But for the price of a cheap IKEA foam mattress, at least I was able to salvage this baby instead of tossing it to the curb! That's the last time I order a sofa from a catalogue without inspecting its construction first.

lisa


Follow my blog with Bloglovin

Thursday, April 12, 2012

[ white slipcover how-to part 2 ]

SO LET'S see, where did we leave off? Oh, right ~ the arms... {if you missed part 1, click here}


The front of the arm was the only pattern piece I ended up cutting out ~ it was just easier to cut out the shape and then pin it all together with the piping.


The front of the chair is now officially done! Now on to the back...

I debated on what type of closure I wanted to use on the back ~ ribbon ties, zipper, buttons. I decided on a zipper up the back. With the slippery leather underneath, I thought it would be the most secure way to keep the slipcover in place.


I thought the flap over the zipper was a nice way to dress it up a bit and hide the zipper from view. I added a small square of velcro to the bottom to keep the flap closed. I chose a very simple, tailored look, avoiding any frilly skirts or pleating along the bottom. Once hemmed, I like that the feet show slightly. 

On the seat cushion cover, I decided to add a zipper along the back for easy removal and to make the cushion reversible. Because I didn't have a zipper long enough to span across the width of the cushion, I used 2 shorter ones and positioned them to meet in the middle. You could also use ribbon ties, velcro, buttons or big snaps here instead.

Fitting the cushion cover was finicky. I wanted it to fit snuggly but still be easy enough to remove for washing. Trying to avoid puckers was tricky.

Done!


Whew! Glad that's done! I love how they lighten up the room and we no longer stick to the leather in our shorts :) Now I just have to work on some new pretty cushions for them.

a few tips:
1} Take your time. This is not a quick project so don't give yourself a deadline. The slower you go, the better your result.
2} Because you are tearing the fabric, there WILL be strings. Everywhere.
3} Make friends with your seam ripper ~ you'll likely be needing it to fix little bloops here and there.
4} You WILL prick your fingers on pins a thousand times.
5} Simplify by omitting the piping all together and using ribbon ties instead of zippers.
6} If you do use piping, remember that smaller piping will be easier to maneuver around curves and corners.
7} Don't stress if they're not perfect. Anything's better than that ugly chair you want to cover!

lisa

Wednesday, April 11, 2012

[ white slipcover how-to part 1 ]

AS PROMISED, today I'll fill you in on my progress with my white slipcovers!

The chair victims... my 2 leather club chairs.


The last time I sewed a slipcover for a sofa and a chair, I was much more intricate and created paper patterns for all the pieces. It took me forever.

This time, I decided to follow the much more free-spirited approach of Miss Mustard Seed and watched her how-to videos before I got started. No pattern pieces, just tear the fabric and start pinning inside out!

I started by making my piping...


Then onto the chairs...{I decided to work on the 2 chairs simultaneously ~ I thought it might quicken the project and avoid me feeling burnt out after one chair, leaving the other without a cover!}


These babies were slippery! If you're making a slipcover for any other type of fabric chair, it will be much easier since the fabric pieces won't want to keep slipping and you can even pin them to your chair if you need to.


Because my chairs don't have a separate back cushion, the shape was a little tricky to work with.


This was definitely the trickiest area ~ just trying to keep the pieces smooth and avoid puckers was enough to throw me off the deep end!


Since there are so many steps involved, I've decided to split this into a couple of posts. Tune in tomorrow for part 2 of my how-to! Let's finish these babies!

lisa

Friday, December 2, 2011

[ homemade chalk paint console makeover ]

REMEMBER THIS console we shipped here from Muskoka?


Well, I've been meaning to give it a facelift for a while now and was really excited to hear about Annie Sloan's Chalk Paint {partly because the results are always so pretty, and because you don't need to sand or prime first - I'm lazy}.

Well, my excitement fizzled when I discovered that no one in Dubai carries it and no one will ship it to me here either. :(

Plan B: homemade chalk paint


I stumbled upon a couple of suggestions on how to make your own so I thought I'd give it a try.

I had some pretty Duck Egg paint from Laura Ashley and decided to use that {eggshell finish} 1/2 cup and mixed it with 1 tbsp of Plaster of Paris.


The best part is chalk paint requires no prep ~  just start painting.


I chose to do 2 coats. The paint dries fairly quickly.


Once the second coat had dried for a couple of hours, I distressed the edges a bit with some coarse sandpaper.


I wiped it clean to remove all sanding dust and then it was time to wax.

I chose Lundmark Clear Paste Wax. Why? Because that's all I could find in Dubai. I was hoping it would be as lovely and soft to work with as Annie Sloan's Wax is supposed to be.


This wax was awesome! I applied it with an old cotton sport sock on my hand and it went on smoothly in a nice thin coat. After about 10 minutes of drying time, I buffed it with a clean sock.


Some new knobs to add some sparkle.


All done! Can you see the lovely sheen the wax gave it?


You can add a coat of a brown wax over top if you want to add a bit more age. Since I couldn't find anything other than my clear wax, I left it as is.


I'm so pleased with how it turned out. The homemade chalk paint worked like a charm and was so cheap. My favourite part was the waxing - it was quick and it gave the perfect sheen.

Now what else can I paint?

lisa


LinkWithin

Related Posts with Thumbnails